February 2015

Sebenernya teknik routing ke vpn ini mirip dengan teknik memisahkan 2line speedy untuk game dan browsing berada di jalur yang berbeda, begitu juga teknik yang di gunakan untuk memisahkan, pb garena agar tidak masuk ke ip publik speedy, yang bisa berakibat ip blok, dan pb garena tidak dapat di gunakan. Silahkan baca cara memisahkan 2 line speedy game dan browsing .

Kembalik ke topik cara setting vpn singapura untuk game point blank garena. Sebagai penyedia Jasa setting mikrotik, seorang pemilik warnet, yang saya setting mikrotiknya, meminta agara vpn singapura miliknya di routingkan ke pb garena, warnet tersebut berada di kota salak, Padang Sidimpuan, saya setting via remote dari rumah. 

Langkah setting vpn singapura untuk pb garena sebagai berikut: 

Langkah pertama cara menggunakan vpn singapura di mikrotik, untuk route game pointblank garena. 


Dial PPTP-CLIENT di mikrotik


Masukkan/ atau isi kolom connect to : dengan ip vpn singapura
Isikan kolom user : dengan user vpn singapura 
Isikan password : dengan password vpn singapura 

Klik tombol OK

Lalu lanjut ke langkah routing vpn singapura di mikrotik untuk pb garena. Paste code berikut ini di terminal mikrotik.

Buat address-list ip garena.

/ip firewall address-list
add address=203.116.49.0/24 disabled=no list=GARENA
add address=203.117.155.0/24 disabled=no list=GARENA
add address=203.117.158.0/24 disabled=no list=GARENA

Buat mangle, berdasarkan port yang menuju ip GARENA yang ada di address list. Src-address isikan dengan network jaringan lokal yang kita gunakan. Atau boleh juga kosongkan, tapi saya lebih suka mengisinya. Lebih jelas hehe. 

/ip firewall mangle 
add action=mark-routing chain=prerouting disabled=no dst-address-list=GARENA dst-port=49100,39190,9000-9300 new-routing-mark=vpn passthrough=no protocol=tcp \
    src-address=192.168.1.0/24
add action=mark-routing chain=prerouting disabled=no dst-address-list=GARENA dst-port=40000-40010 new-routing-mark=vpn passthrough=yes protocol=tcp \
    src-address=192.168.1.0/24

Kalau udah, langkah terakhir adalah membuat routing ke vpn di /ip route

/ip route

add check-gateway=ping disabled=no distance=1 dst-address=0.0.0.0/0 gateway=172.16.10.1 routing-mark=vpn scope=30 target-scope=10

Oh iya, jangan lupa untuk masquerade interface pvn milik kita di /ip firewall nat. 

add action=masquerade chain=srcnat disabled=no out-interface=vpn-sg

First, you need to install the PPTP daemon (server), and we are going to use apt-get to install it.
1
apt-get install pptpd
Once it is installed, let’s create user accounts for your VPN server by editing the chap-secrets file. Use any editor you like, I personally prefer Nano.
1
nano -w /etc/ppp/chap-secrets
Each users should be added in new line with following structure
1
yourusername pptpd yourpassword *
Next step is to configure localip/remoteip assignment on pptpd.conf
1
nano -w /etc/pptpd.conf
Since my local router is on 192.168.0.1, I wanted to avoid using the same IP assignment for my VPN connection. so I’m using 192.168.111.xxx instead on pptpd.conf
1
2
localip 10.10.0.1
remoteip 10.10.0.5-100

Save the file and exit the editor. Now edit the ppp configuration file:
pico -w /etc/ppp/pptpd-options
add the following at the end of file:
name pptpd
refuse-pap
refuse-chap
refuse-mschap
require-mschap-v2
require-mppe-128
ms-dns 8.8.8.8
#ms-dns 8.8.4.4
proxyarp
nodefaultroute
lock
nobsdcomp
mtu 1490
mru 1490

Now, let’s get IP forwarding working by editing sysctl.conf file
1
nano -w /etc/sysctl.conf
then uncomment this line
1
net.ipv4.ip_forward=1
Save the file and reload the configuration.
1
sysctl -p
Next is to edit rc.local file for iptables rule
1
nano -w /etc/rc.local
Add the iptables rule to create the NAT between eth0 and ppp interfaces:
iptables -t nat -A POSTROUTING -o eth0 -j MASQUERADE
iptables -A FORWARD -i eth0 -o ppp0 -m state --state RELATED,ESTABLISHED -j ACCEPT
iptables -A FORWARD -i ppp0 -o eth0 -j ACCEPT
Note that iptables MASQUERADE doesn’t work on OpenVZ VPS containers. Works on KVM and XEN.
If you use OpenVZ, you need to use iptables SOURCE like this:
iptables -t nat -A POSTROUTING -j SNAT --to-source <Public Server IP>
now restart pptpd by running:
service pptpd restart

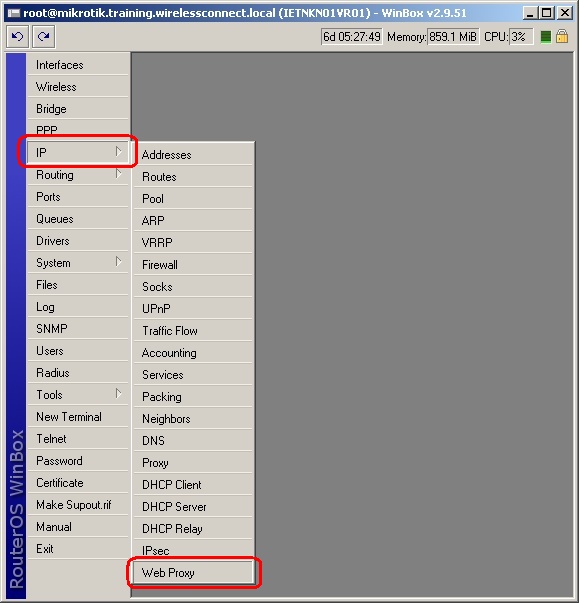
Winbox into the Router OS Hardware that you intend to install the webproxy onto, Click on IP \ Web proxy as shown below

Klik Gambar / iklan dibawah untukdapat update informasi tentang VPN dan settingan di blog ini, terima kasih .


  • Click on Settings as shown below
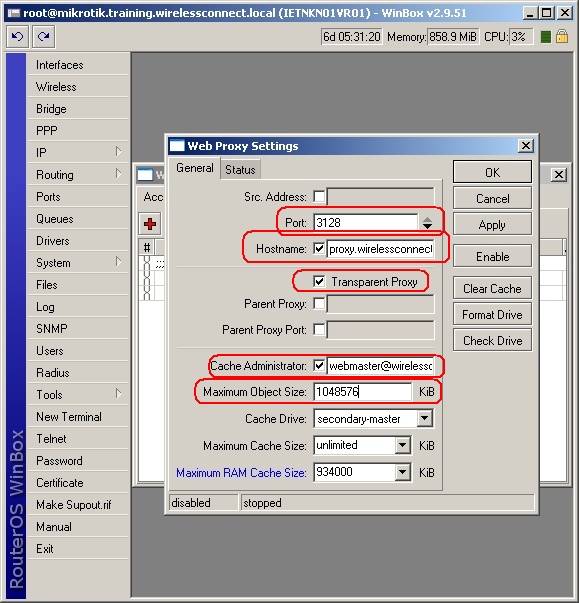
  • Fill in the following details as shown in the picture below
  • Port:-- select 3128 (standard Squid TCP Port) or 8080 (typically used Http proxy server TCP port) however any available port on the Router OS Appliance can be used (provided that the port is not already being used by another process)
  • Host name -- Select a host name that you desire (it is not crucial however it is useful for handing out a dns name such as proxy1.wirelessconnect.eu ... (Remember to update your DNS server with the Proxy IP address before issuing the name to clients
  • Transparent Proxy -- Tick this Box if the Proxy Server is to be Transparent, ie the user will not be required to configure their browser (note additional firewall configuration (redirect rule  will need to be inserted to make this work see bottom of article for more details)
  • Cache Administrator-- Select an Administrative Email-address for receiving feedback on your Proxy Appliance Performance
  • Maximum Object Size -- Select a reasonable size (It should be large enough for most users uses ...e.g Service Pack 2 Download ... Patch CD ISO,) however it should not exceed the Size of the Caching Disk (We Recommend that the Maximum Object Cache be a tiny fraction of the total cache size i.e. Maximum Object Size should << 1% of Caching Disk)
     
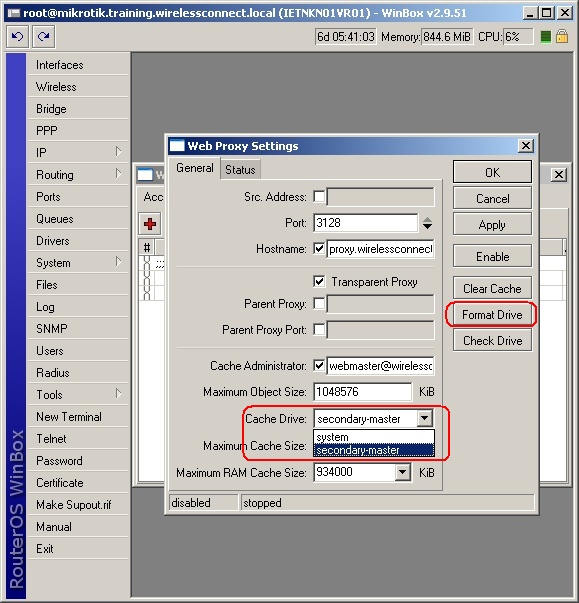
  • Select the correct Drive (secondary-master) as the Cache Drive and then click Format as shown below (Note that Router OS wont Let you format the System Drive)
  • When prompted to confirm the formatting  as shown below
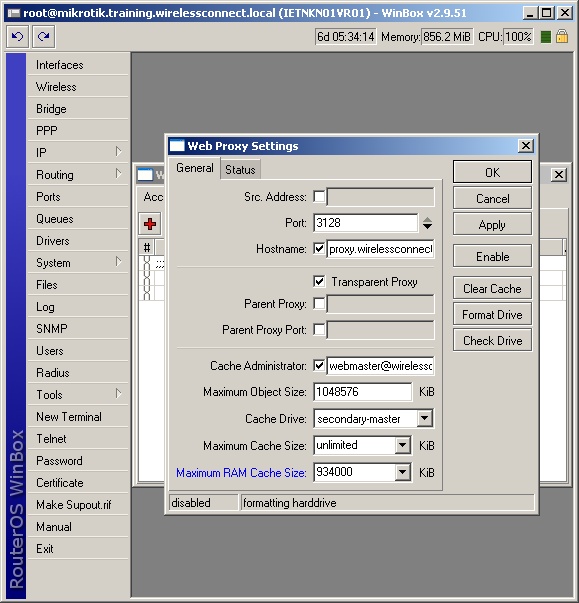
  • While the cache drive is formatting , "formatting harddrive"  will appear on the status bar on the bottom of the dialogue box as shown below
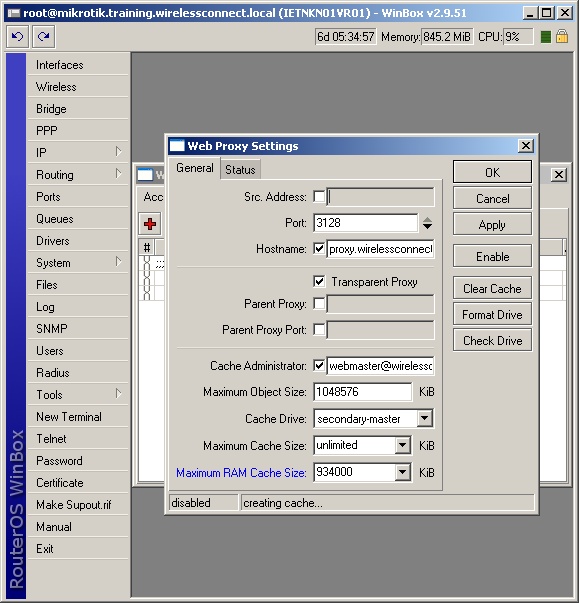
  • After the formatting process is complete the Cache will be created & "Creating Cache" will appear on the status bar at the bottom of the dialogue box as shown below.
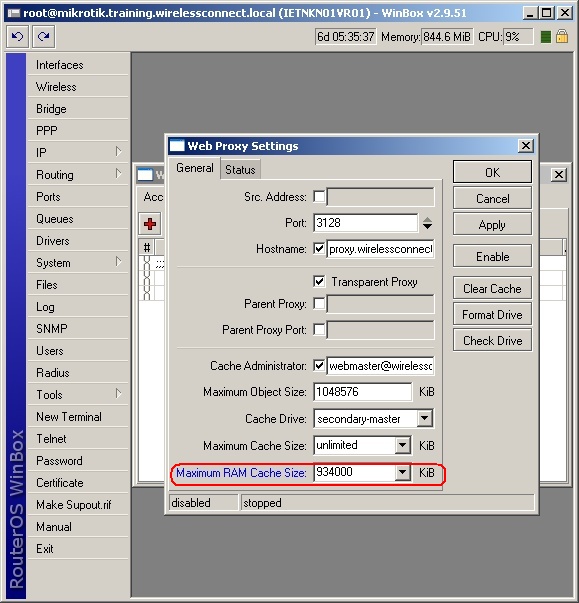
  • Select the Maximum RAM Cache Size, this should be no greater than the result of the following formula -- (Total RAM on Proxy Appliance) - 64 MB Ram (For Router OS and Other Router OS Process) in this  example one has an appliance with 1GB of Memory installed and one  wishes to reserve 68 MB of RAM for system use therefore one should set the Maximum RAM Cache Size to 934MB as shown in the image below
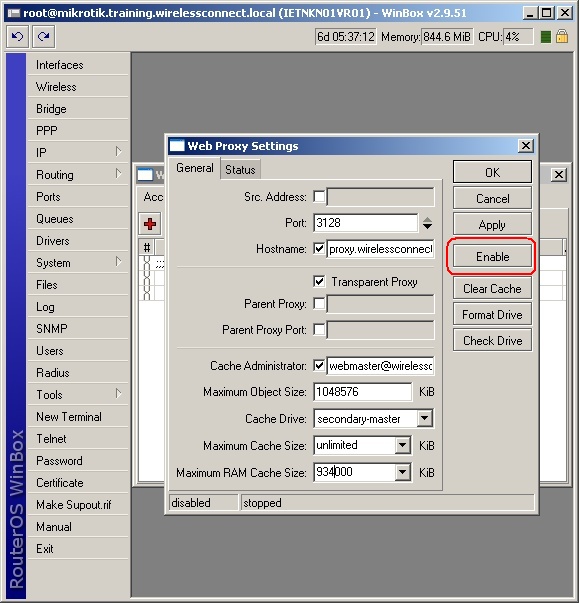
  • Next Turn on the Proxy Server by clicking Enable as shown below
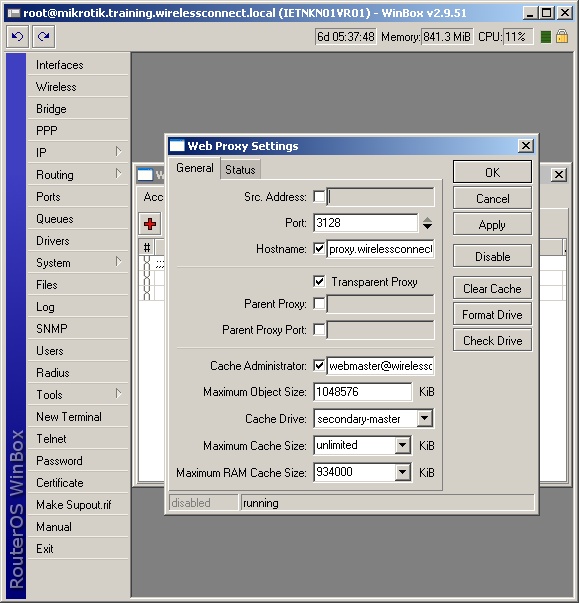
  • Once the Proxy Service is running the status bar will show "Running" on the bottom of the dialogue box as shown below
Proxy Running State will be displayed in the Status Bar

Open Internet - Memang sedikit terlambat dalam pembahasan SoftEther ini, diakibatkan ada kesibukan pada hari kemarin yang memaksa artikel ini ditangguhkan. Mungkin beberapa orang menanti kehadiran artikel ini setelah meluncurnya pembahasan Apa itu SoftEther VPN?
Bila dijelaskan sedikit, SoftEther VPN adalah sebuah layanan yang memudahkan kita untuk menggunakan VPN dari berbagai belahan dunia. Dengan menggunakan Client VPN dari SoftEther maka penggunaan VPN akan jauh lebih maksimal jika dibandingkan dengan PPTP VPN. Dengan kata lain SoftEther VPN adalah pilihan cocok bagi anda yang ingin menggunakan layanan VPN ke tahap yang lebih menantang yakni advanced.
Untuk selengkapnya mengenai Cara Konfigurasi Inject + SoftEther VPN bisa anda simak di bawah ini.
1. Saya pastikan anda sudah menginstall aplikasi VPN SoftEther, bisa anda download di sini bila belum punya aplikasinya. Silakan untuk langkah yang pertama pastinya anda harus menghidupkan inject yang anda gunakan. bisa download Disini
2. Lalu buka aplikasi SoftEther VPN yang telah anda install sebelumnya. Langsung saja klik kanan dan pilih New VPN Connection Setting pada kolom bagian atas, tepatnya seperti gambar 1 di bawah.
Vgate 1
Image: Vgate 1
2. Bila muncul dialog seperti gambar 2 di bawah silakan klik Yes saja. Itu adalah sebuah perintah tentang deteksi otomatis sebuah koneksi internet dari inject atau ssh (bila memang anda sedang menggunakan ssh)
Vgate 2
Image: Vgate 2
3. Langkah yang ketiga ini adalah untuk pengaturan proxy yang sedang digunakan. Samakan listen port dengan inject yang sedang anda gunakan. (Lihat gambar 3)
Vgate 3
Image: Vgate 3
4. Untuk pengaturan selanjutnya sebaiknya anda membuka situs www.vpngate.net/en/ terlebih dahulu untuk mendapat akun VPN gratis (bukan PPTP VPN) yang bisa digunakan pada SoftEther VPN. Atau anda bisa mengikuti pengisian konfigurasinya berdasarkan gambar 0 yang saya sajikan di bawah.
Vgate 0
Image: Vgate 0
Silakan samakan SoftEther VPN yang sedang anda konfigurasi dengan gambar 4 yang ada di bawah. Seperti Host Name, Port, virtual hub name diisi dengan vpngate. Untuk pengisian User Authentication isi dengan Username: vpn, dan Password dengan vpn.
Vgate 4/>
Image: Vgate 4
5. Untuk langkah kelima adalah langkah pengkoneksian. Bila inject anda bagus atau masih work maka koneksi akan berjalan lancar. Cara untuk pengkoneksian cukup mudah, yang anda perlukan hanyalah meng-klik kanan pada profil VPN yang telah anda buat. Klik kanan dan pilih Connect tepatnya seperti gambar 5 di bawah.
Vgate 5
Image: Vgate 5
Untuk contoh VPN yang sudah sukses terhubung ke server VPN bisa dilihat dari aplikasinya seperti gambar 6 di bawah.
Vgate 6
Image: Vgate 6
Dan yang terakhir adalah selesai. Itulah sekelumit Konfigurasi SoftEther VPN yang saya rasa nampak rumit bagi pemula. Namun bagi anda yang ingin masuk ke tahap advance bisa mempelajari tutorial yang satu ini. Semoga bermanfaat.


In the first step, login to your router, launch a browser or use WINBOX application.
Type, default ip address of the router: http://192.168.88.1

Go to “PPP” (1) tab and add (2) new interface: “PPTP Client” (3)


TP-Link

In the “General” (4) tab, in “Name” (5) field , type interface name: VPNonline-PPTP
In the “Max MTU” (6) and “Max MRU” (7) field, type “1400”

TP-Link

Click “Dial Out” (8) tab and fill in the fields below:
In the “Connect to:” (9) field, type the name of one of the VPNonline server


In the “User:” (10) field, type your User Name
In the“Password:” (11) field, type your password
To save settings, click “OK” (12)

TP-Link

Go to the “IP” (13) tab and next to“Firewall” (14)
Select “NAT” (15) tab and add new NAT rule (16)

TP-Link

In the “New NAT Rule” (17) select “Chain: srcnat” (18) and “Out. Interface: VPNonline-PPTP” (19)

TP-Link

In the next step, go to “Action” (20) tab and in the “Action” (21) field choose “masquerade”.
Click“OK” (22)


TP-Link

Go to the“Mangle” (23) tab and add new rule (24)

TP-Link

In the “New Mangle Rule”, select “General” (25) tab, and choose “Chain: prerouting” (26).
In the “Src Address” (27) field, type either the IP, or the IP range which you wish to have routed through the VPN tunnel.


In this example, we are using source address in order to identify packets which should be routed throught VPN (192.168.88.2-192.168.88.254). You can also use other means of identification or a combination of identifiers such as destination port and source address. Keep in mind, you need to make sure that traffic originating from the MikroTik router is exluded from this marking or it will attempt to communicate with the VPN server through the VPN itself, causing the connection to brake.

TP-Link

Go to “Action” (28) tab and in the “Action” field choose “mark routing” (29)
In the “New Routing Mark” (30) field, type “VPNonline”
To save the settings click “Apply: (31) and “OK” (32)

Klik Gambar / iklan dibawah untukdapat update informasi tentang VPN dan settingan di blog ini, terima kasih .


TP-Link

Go to “IP” (33) and “Routes” (34) tab
Select “Routes” (35) tab, and add New Route (36)

TP-Link

In the “General” (37) tab, choose:
“Dst. Address” (38) – 0.0.0.0/0
“Gateway” (39) – VPNonline-PPTP
“Routing Mark” (40) – VPNonline
To save settings, click “OK” (41)

TP-Link

The new route has been added (42) and the VPN connection should be established

TP-Link

If you have any problem with the configuration or have any questions feel free to mail us: rubaimohamad@yahoo.com
CP : 081391800081
Thanks

Author Name

Formulir Kontak

Name

Email *

Message *

Powered by Blogger.